How to Make a Mask Without Pleats (With Filter Pocket!)
2020-08-05
Making masks can be easy. You can certainly make reusable cloth masks, with minimal effort. This mask pattern is based on a mask pattern designed for medical professionals for use when N95 masks are not available called the Olson Mask Pattern. It does not have pleats or creases.
Choosing the Right Material
Wearing a mask can do wonders. It can protect you, and help ensure that your respiratory droplets don't get on other people. However, without the right material than the mask is pointless. If you were using athletic material, jersey knit, and different stretchy or extremely breathable fabric, you’re looking at very low effectiveness or an utterly ineffective mask.
High effectiveness requires a densely woven cotton. This is known as quilters cotton, and you can surely find 100% tightly woven cotton at any fabric store and online. Thanks to most fabric stores’ quick responses to having to close down and it's the pandemic, many have made it very easy to shop for new fabric online. But don't be afraid to dip into your fabric stash too.
Cut Your Pieces
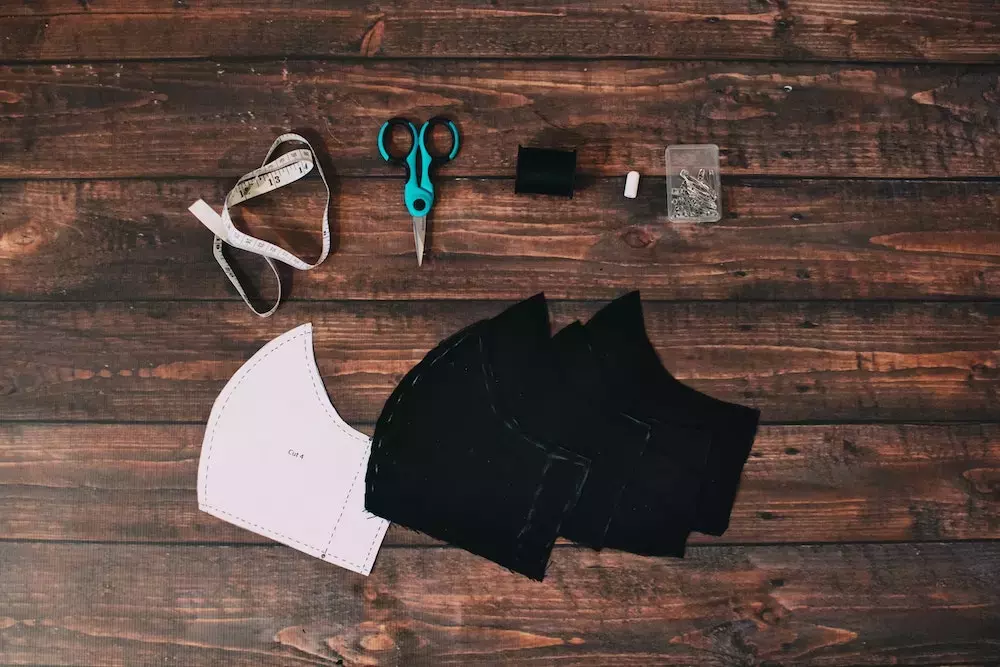
This particular mask pattern calls for 6 pieces. You will need it 2 mouthpieces, 2 cheek pieces, and 2 facepieces. There are many places where you can find printable options for the Olson mask pieces online, but if you don't have a printer, it's pretty easy to sketch out the dimensions.
Sketching and cutting out your face pieces
- For the face portion, you will want to draw a four-sided shape.
- Draw a shape with four sides that flares at one end.
- The top line should measure 6 ¼-inches x 6 ¼-inches x 6 ¼-inches x 3 ⅛-inches with the shortest side as the right edge.
- You should roughly get the shape of what a mask would look like if folded in half and laid on a table.
- Curve the top and bottom by:
- Measuring 2-inches in from each side on the top, make a gentle slope reducing by 3/8-inch in the first third of fabric from the long-edge, and cutting another 3/8-inch over the remaining two-thirds of material on that side.
- For the bottom, create a more drastic curve losing about the same volume.
- Curve the left-most line for a chin-to-nose shape
- About 2 ¼-inches down from the top, extend the shape by an additional 1 ¼-inches.
- About 3 ½-inches upward from the bottom, extend the shape by 1-inch.
Sketching and cutting out your cheek pieces:
- Draw a trapezoid shape set on its side, where the longest edge is on the left, and the shortest edge is on the right.
- The top and bottom should measure 5-inches long but have a gentle slope from corner to corner.
- The longest edge should be 5 ¼-inches long.
- The shortest edge should be 3 ⅛-inches long.
Sketching and cutting out your mouthpieces:
- Draw another trapezoid with the longest edge on the left.
- The top and bottom should measure at 3 ¼-inches long.
- The longest edge should measure 6 ¾-inches long.
- The shortest edge should measure 4 ¼-inches long.
- 2-inches down from the top of the longest edge, extend the section outward by 1 ¼-inch.
- Create a wide slope across the longest edge extending outward with the dimensions listed above.
- Create two gentle slopes dipping inward from corner to corner across the top and bottom to meet the shortest edge.
- Cut two of each piece.
Making the Visible “Face” Portion
Sew both face pieces together along the curved edge, with right sides facing, so the seam folds inward on the "wrong" sides. Use a 1/4-seam.
Making the Mouth Portion
Sew both mouthpieces together on the curved edge, again with a 1/4-inch seam. Then fold the straight edges of the mouthpiece with a 1/4--inch seam to give them a polished look.
Making the Cheek Portion
Fold down the longest straight edge and create a 1/4-inch seam.
Completing Your Mask
To complete your mask, overlap the cheekpieces behind the mouthpiece by 1 ¾-inch from each straight side of the mouthpiece. Then, sew inward to the center of the mouthpiece using a ¼-inch seam from the sides of the cheekpieces. This creates a dart so you can easily insert a filter.
Give the back portion a ¼-seam all the way around with a topstitch. Then, align the top facepiece with the back portion. Put the right sides facing, and then stitch with a ¼-inch seam all the way around. You will use the filter flap to turn the fabric.
To attach hairbands for holders, place the hair tie on each side’s edge, fold the fabric over to cover, and use a simple stitch to lock it into place.
Mask making can be a fun project to do with your family or for your business. If you still need materials or would like to buy in bulk, contact our customer service team. They can help you get all the important items for your next project.


