How to Use a Heavy-Duty Upholstery Sewing Machine
2023-02-21
Why Upholstery Sewing Might Seem Intimidating
The idea of repairing a piece of torn upholstery fabric or even creating your couch or chair cover can be intimidating, especially if you don’t have much sewing machine experience. However, sewing upholstery can be quick and easy if you have the right tools and know-how.
Essential Tools for Upholstery Sewing
Before you put upholstery fabric anywhere near your sewing machine, you’ll need to have a few accessories on hand first. Though upholstery can be easily stitched with a variety of different machines, this thick fabric can damage your sewing machine if you aren’t using the right accessories.
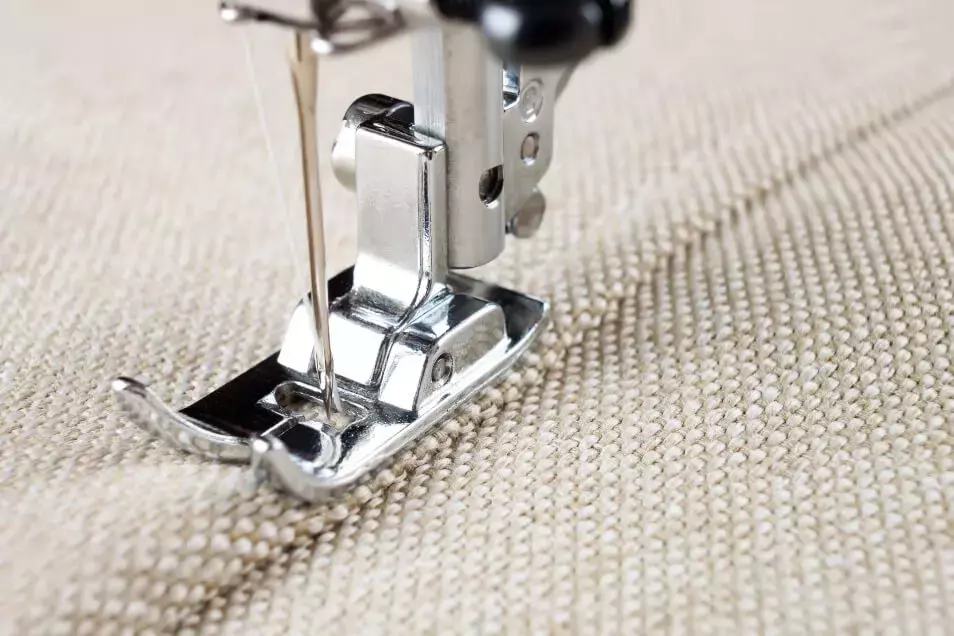
Heavy-Duty Walking Foot
Ensure you have a heavy-duty walking foot to attach to your machine before you begin. Most industrial sewing machines and even some domestic machines have the ability to work with this kind of presser foot.
Industrial-Grade Sewing Needles
Additionally, you’ll need to upgrade your stitching needles to industrial-grade models, and the thread in your machine will need to be extra thick. We recommend 69 nylon bonded style thread to ensure your stitches stay in place as you work.
Sewing with Backing
Remember that for many upholstery projects, you will also need to sew with backing to stabilize the material. To support backing, your upholstery sewing machine will need a portable walking foot. If your sewing machine can’t support this type of presser foot, you may need to upgrade to complete your upholstery project.
A Step-By-Step Guide to Upholstery Sewing
Ready to get started? Here’s what you’ll need to do.
Carefully Inspect Your Upholstery Material
If you’re repairing a piece of frayed material, take a pair of sharp scissors and trim the frayed or worn edges off. Be careful to trim off only the parts that are frayed and no more, as you don’t want to take off usable pieces of fabric accidentally.
Set Up Your Sewing Machine to Prepare for the Project
If you haven’t already, it’s time to replace your needles with industrial-grade sewing needles, put a heavy-duty thread into your machine, and ensure a portable walking foot is attached. Then, set your upholstery sewing machine to a medium stitch length and a mid-range level of tension for optimal results.
Before you can begin sewing, it’s important to check whether your upholstery material has a nap. You can do this by brushing down the material with your tool or hand and making sure that each little piece of the fabric is laying the same way, with none giving any resistance or trying to lay a different way than the others.
If you skip this step and your material has a nap in it, it could cause problems with the aesthetic result at the end.
Double-check to make sure your sewing machine has a portable walking foot, whether the machine came with one attached or you attached it yourself. Make sure the needles you installed are between a size 18 and 22, depending on the specific fabric thickness, and check that your thread is 69 nylon bonded.
Put Your Material onto the Machine
It’s time to place your upholstery material onto your machine. Many sewing machines with walking feet built in already have a natural lift of about 3/8″, which allows more material to be laid under the presser foot.
Whether your machine has a built-in walking foot or you attach one later, leave a small amount of seam allowance. Additionally, check to see that your raw edges being sewn together are right on top of one another and that the right sides face each other.
Start Sewing
Begin sewing as you would with any material. Feed it through the machine slowly and precisely to ensure your stitches are as even as possible. Once you’ve completed your initial stitches, you may want to finish up any remaining raw edges with a serger.
If you choose not to use a backing, you’ll need to add a backstitch to prevent unraveling.
Where to Find the Best Upholstery Sewing Tools
Find the Sewing Machine Accessories You Need for Perfect DIY Upholstery at GoldStar Tool
Upholstery repairs and many other DIY sewing machine projects are well within your reach at GoldStar Tool.


